Go to

#drawing

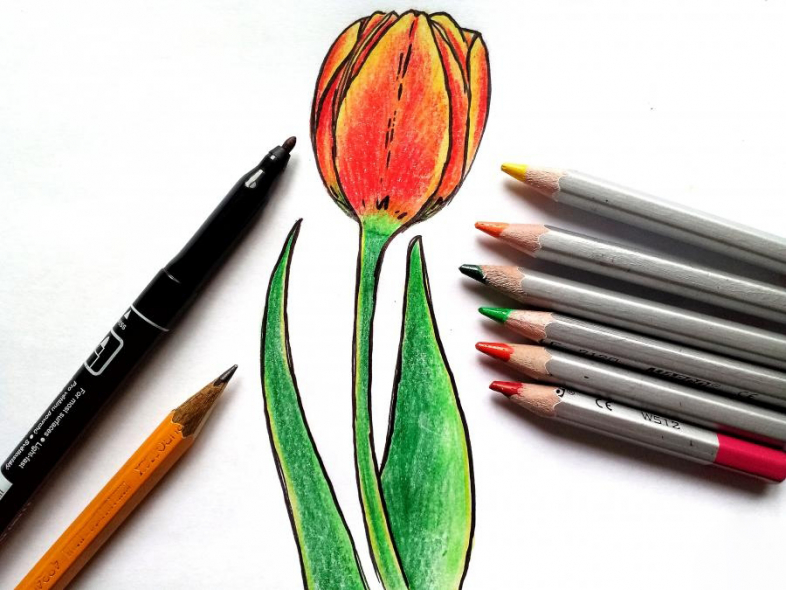
Draw a tulip in 8 simple steps

19. February 2022
kak-narisovat-buton-tyulpana-8

Do you like flowers? Would you like to enjoy them even in the seasons when finding real tulips isn’t exactly easy? Well, why don’t you go ahead and draw one instead? You can put it in a frame and enjoy its beauty until the real thing becomes available again! And if you’re intimidated, don’t fret – we’re here to help!
So, what are the basic principles of drawing flowers?


Drawing flowers might seem daunting – maybe you already tried and felt like something was missing from your artwork. If only you could pin-point what it was…See, details are very important when it comes to flowers. You won’t just get away with a stem and the flower – you need to focus on small details; the lack of them might be the cause of your previous attempts not turning out the way you expected. Beginner artists also tend to lack the patience and the experience – something you can gain only with regular drawing and painting practice.
Still, anyone can draw a tulip, even a child! Plus, it’s a great way to practice your patience. So, how does one draw a beautiful tulip? By following these eight steps!
1. Draw an oval in the middle of your paper – this is a base of your tulip’s bud. Next, draw a line passing through the middle of the oval and going down, curving slightly to the left. This is your stem.
2. Draw petals inside the oval, with the largest petal taking up the foreground in the middle and the smaller petals around it. Give a slight curve to some of the smaller petals on the sides.


3. Draw a stem coming out of the bud’s bottom part, adding leaves around the stem. Make them long, wide at the bottom and narrowing toward the top. Don’t try to make them identical – they aren’t identical in reality either, so why should you?

4. Outline the flower with a black pen – this will allow you to hide the lines that are not meant to be seen but were necessary for the drawing’s construction.
5. Make the petal edges yellow, adding a bit of orange as well. Try to make smooth transitions, just like on a real flower, making your strokes go inward, from the flower’s edge to the centre.
6. Colour the centre of the petals in red, creating a smooth colour. Keep your strokes going from the outer edge toward the centre to create the right texture. Try using a wine-coloured pencil to add shadows to the petals to make them more realistic.


7. Now grab some greens for the stem and the leaves. Use light green on the leaves’ edges, moving towards darker shades of green as you get closer to the centre.
8. Final tip: use a black pencil to accentuate important outlines, perhaps even using a black marker on some of the petals.


Voila, you just drew a tulip! Isn’t it beautiful? Was this experience inspiring enough to make you want to learn more, perhaps how to draw other flowers, animals, portraits or still life pictures? Sign up for our coloured pencil drawing course for beginners and learn everything you need from the best! We promise you will have fun and create amazing artworks that will make you proud.

kak_narisovat_glaza_i_brovi9

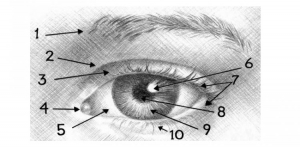
Before we begin, let’s get some anatomical terms sorted out to make sure the instructions are not confusing.

1 – Eyebrows, 2 – eyelid crease, 3 – upper eyelid, 4 – lacrimal caruncle, 5 – sclera, 6 – reflection, 7 – eyelashes, 8 – pupil, 9 – iris, 10 – lower eyelid. 


Now look at the eye drawings below, paying attention to different viewing angles. Notice how different people have very different eye shapes, eyelid sizes, and eyelashes.

Now, let’s get started! Draw two circles, one inside the other – the eyeball and the iris.

Next, add lines representing the edges of the upper and lower eyelid, then continue by adding a pupil and the edge of the face.

Use an eraser to remove the lines above and below the eye, then create the basic eyebrow shape using a few short strokes.

Next, add another line close to the upper edge of the lower eyelid – this will be the lower edge of the lower eyelid. Add an elongated drop shape below the eye, to the right, then place an oval above the eye, still to the right, and finally, add the lacrimal caruncle. Add a light reflection into the pupil as well.

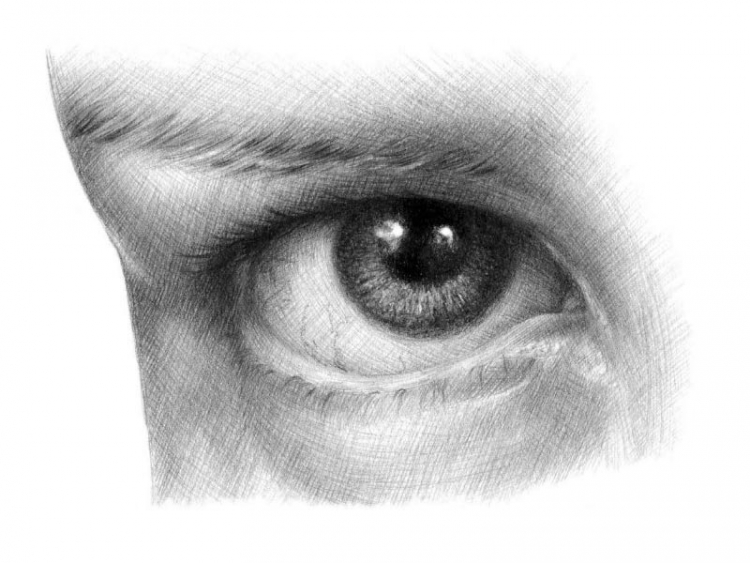
Now move on to hatching. In our model picture, the hatching shows where the darkest areas are. Pay attention to the direction of the hatching lines – they must follow the facial shapes! Use HB and 2B pencils to hatch the darkest spots, paying attention to areas with no hatching at all – these are the lightest spots in the drawing. Let’s say we’re drawing brown eyes – that means that the iris will be dark too. Use a midtone for light brown, blue, or green eyes and make sure to keep the iris very light and contrasting for light blue, light green, or grey eyes.

Now use 2H and HB pencils for cross hatching, adding volume by creating a wide range of tones, from very light to very dark, almost black. Darken the iris.

Use HB and 2B pencils to add midtones, taking time to carefully study all shadows and half-shadows. Pay extra attention to areas that have to remain light. Contrast between light and dark tones is important in drawing, adding realism and volume to your work.

Use a 2B pencil to add a shadow to the inner and outer eye corner, then use sharp 2B and HB pencils to draw an eyebrow. Next, grab a 4B and 6B pencil to shade the iris, making sure to keep some light reflections in the eye. 

If you wish, darken the areas above the eye by adding more lines to the existing hatching. Darken the eye corner and continue to work on the shading. Use an HB pencil to draw eyelashes and keep in mind that they grow from the outer edges of the eyelids. Finally, add some thin, crooked lines to represent the veins. 

Wow, this was quite a detailed tutorial, don’t you think? Still, the best way to master drawing skills is by learning from an expert 😊 Come join us at Draw Planet and sign up for our drawing course for beginners! Or perhaps we’ll see you at our portrait drawing course? Choose the one that calls to you and come learn with us!


Drawing a comic

17. February 2022

comics

Have you ever thought about drawing your own comic strip or even comic book, thinking “How hard can it be? It’s just a couple of simple characters in neat little frames saying something clever”.  So you sat down at your desk with your pen and paper and… nothing happened. Turns out it’s not that easy after all, but don’t fret – we’re here to help!

There are three key elements that make a good comic. First, you need good characters with distinct personalities. Then you need a captivating story that you will be able to maintain and develop, and finally, you need to find a drawing style. Now let’s begin right away, starting with the first thing – your protagonist. Try making a sketch of him or her. Keep in mind that your protagonist will experience different situations and emotions, so try capturing them in different poses and with different facial expressions. Once you are happy with the result, make sure your character is coherent and voila – your protagonist is ready!

Now think about your protagonist’s personality and backstory. Any character can have a crazy backstory, even if it’s a cute little rabbit munching on a carrot. Maybe an amazing story already starts to take shape in your mind as you are thinking of your protagonist’s background, but hold your horses for now. Instead think of what your character is like. How will they react to danger? What makes them happy? What makes them mad? Fleshing out your character will help make your story more authentic. 

Now it’s time to think about the story. You have a protagonist that you can use, and you are already imagining the adventures they are going through. The key thing a story needs is a plotline and humour. It’s not like you have to create the next Moby Dick, but it would be a crying shame if your frames had no point to them and simply fizzled out. So keep writing and lay down some story structure to follow and to make sure you have the main plot and a decent ending. And don’t be lazy – do this even if it’s just a super short comic that you’re working on.

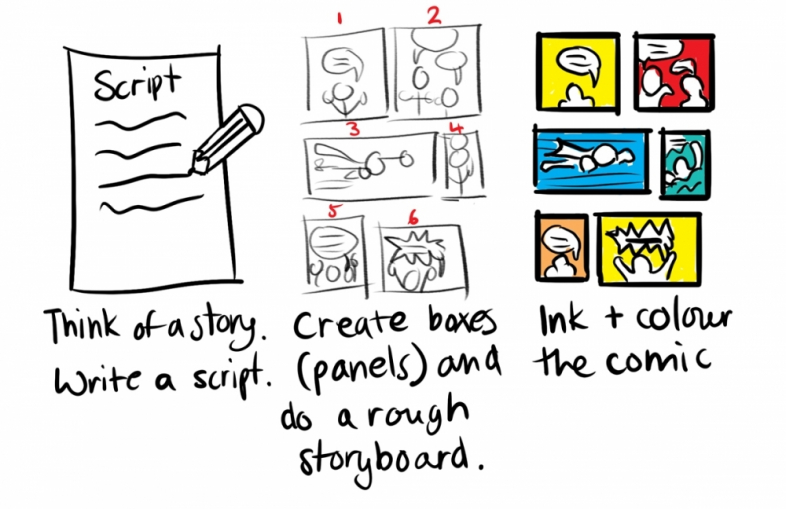
Next, you need to put it all together, which means the majority of drawing work is now ahead of you. Get a notebook and try to put your story in individual scenes that you want to draw. Make outlines of these scenes, adding dialogue. Keep in mind that we’re still at the drafting stage, not at the final product. Perhaps show your draft to a friend or a family member to get an honest opinion, and when you are happy with the feedback you receive, move on to working on individual scenes and images and start putting in the real, homerun effort.

So, how did it go? I bet you are super proud of your first comic creation! And please don’t be too hard on yourselves, nobody is great at stuff right off the bat. Did you find this journey fun and perhaps would like to continue? Come join us at Draw Planet and let our professional comic book artists help you get a solid foundation! Register now and make a comic book that will blow your mind!


64bb426b8ff4e32d348f84553f1d5b74

How to get rid of your fear and finally start your artistic journey 

You get inspired, you want to grab a brush or a pencil and get creative, but then anxiety and fear of failure take over. Sounds familiar?  You are not alone! Many people are afraid to start and if you are one of them, we hope this article helps you break down the barriers that are holding you back and inspires you to finally take the first step – maybe after you’re finished reading? 😊

The good news is, art is like any other trade, and trades can be learnt! Now, every trade comes with its own set of rules and principles and drawing or painting are no different! Think of the process of learning to play an instrument – someone has to explain it first before you can start practising, and it’s just like that with art. 

You can start at any age. It doesn’t matter if you dive in as a child, a teenager, or at 70 years of age. You’ll do great as long as you keep your enthusiasm! Creative activities are also proven to slow down the ageing process, which is why all artists, new and old, always remain young at heart 😊

Creativity is a skill like any other, which means you can practice and get better at it! Grabbing a pen and making a few doodles is enough to give your brain a chance to work differently than it usually does, thus practising your creativity. Pretty cool, right?

It takes time and practice to become good at drawing and believe us when we say that every great artist used to be a “rookie” at some point – we all have to start somewhere! You just need to keep at it, working your way toward improvement. And that means making mistakes and trying again… and again. Your last mistake is your best teacher, and that saying is especially true in art.

And finally, creative activities are good for you! They help us relax and release our emotions, so by discovering your inner artist, you are actually doing something positive for your mental health, improving your empathy and awareness! And what better way to discover that hidden inner artist than by simply drawing, painting, and making art?

Believe in yourself and your talent will surface, trust us! All you need is some practice and a good teacher – and pssst, we don’t want to brag, but ours are really nice, friendly, and amazing! Have no fear and come join us at one of our courses; we have plenty of options for complete beginners! Choose what you like at and become a confident artist!

How to draw a dog

16. February 2022

kak_narisovat_staffordshirskogo_terera_karandashom-15

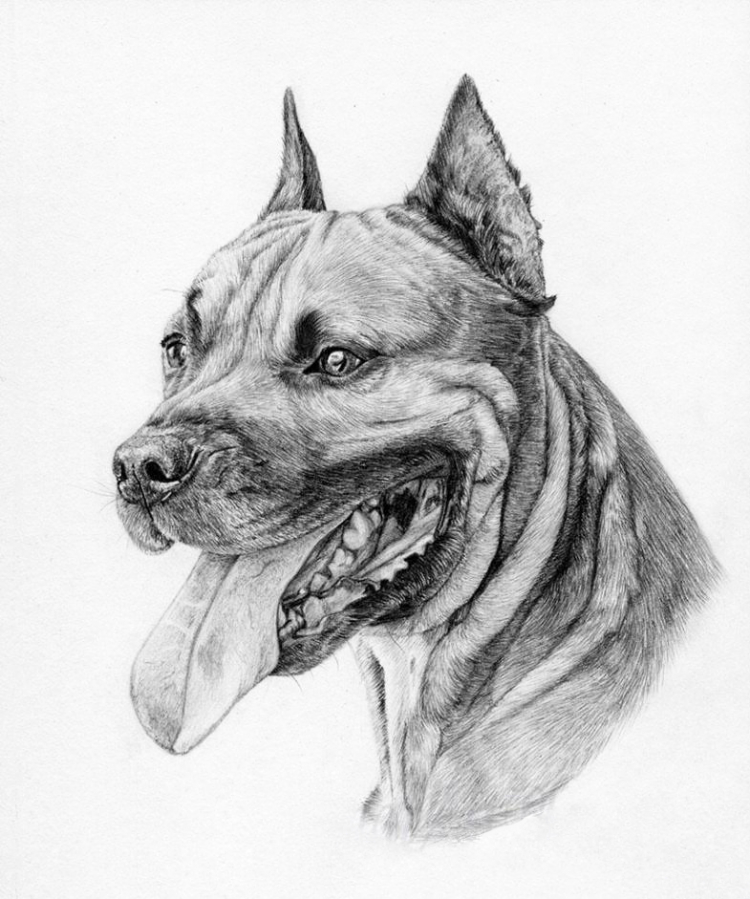
A simple pencil is more than enough to create a realistic drawing – you just need to know how.

Step 1
Make a sketch using a 2H pencil, trying to outline and mark the places where the tones will shift. When you are satisfied with the sketch, lightly go over the entire thing with an eraser to soften the lines.

Step 2
Begin hatching, starting with the eyes. Why eyes? First, the picture will already start to look alive, and second, eyes are the darkest part and can be used as reference for further shading and hatching.

Step 3
Use a 2T pencil to outline the hair growth direction around the eyes and on the forehead.

Step 4
Begin adding hair, starting from the darkest area – the eyebrow arc. Use short strokes to mimic short dog hair.

Step 5
Continue working in the same way to add hair around the other eye.

Step 6
Move on to an ear. Its darker shade helps separate it from the forehead clearly. Keep using short strokes and add small, sticking out hairs to avoid a hard transition between the dog and the background. When working the wrinkles in the dog’s skin, keep in mind that making them three dimensional is the key here. Do this by making the edges dark and adding light and shadow to the wrinkles.

Step 7
Start working on the second ear, again making your way from the darkest areas to the lighter ones. Don’t forget about the hair at the back edge of the ear.

Step 8
Now work the inside of the ear. Start by filling the entire ear with an even shade using a 2H pencil and try to keep the strokes the same colour (but don’t smudge the pencil work!). Next, take an HB pencil and start adding darker areas and more detail and definition, trying to keep strokes from becoming too obvious. Use a 2B and 5B pencil to darken the forehead as well.

Step 9
Move on to the nose and start by filling out the darkest areas but keeping them barely visible before moving on to a softer pencil and making the shadows more pronounced using a circular motion. Focus on the nostrils and use the softest pencil, 5M, to work on them. When you’re done with the nose, use very short strokes to draw the hairs above the muzzle, paying attention to the hair growth direction.

Step 10
Work on the muzzle, starting with even, midtone hatching before deepening the shadows of the darkest areas.

Step 11
Now move to the tongue, working the way you worked the ear – start with even hatching, making sure that individual strokes are not too obvious, then deepen the shadows and finally, use the edge of your eraser to create light reflections.

Step 12
Continue using the same method and move on to the jaw, paying attention to the many details in the dog’s mouth. Start with the darkest areas and work your way to lighter areas.

Step 13
Hatch the lower jaw.

Step 14
Draw the wrinkles (skin folds) on the neck and make sure to properly capture their volume. You will need to pay extra attention to the hair growth direction  (the hair is in the fold too, but the direction can vary with every fold). Start your strokes in the darker area and move to the lighter area.

Step 15
Finish working on the neck. That’s it, your drawing is now finished!

Are you a fan of drawing? Are you curious to see what other media can be used to create monochromatic pictures? Come join our drawing course and learn all about perspective, still life, figure drawing, and much more!


Acrylics vs oil paint

15. February 2022

4e46301e22f82fb57002c2d0147a3472

Acrylics and oil paints are the most common paints in art.

The key difference lies in their chemical composition – while acrylics are synthetic and contain water, oil paints are composed of natural ingredients and their manufacturing involves dissolving the pigment in oil.

With that being said, many contemporary artists use both of them, often combining acrylics and oil paints in the same painting! In such cases, acrylics are used for a base and oils come into play to add surface details, a method that doesn’t require the artist to wait for the underpainting to dry completely. 

Let’s briefly go over the key properties of these two types of paints.

Acrylics are water-based and made with synthetic materials and they darken slightly once dry. 

Oil paints are made with natural oils (with a synthetic drying oil being used sometimes as well) and pigments. They maintain colour well after drying but require special canvas preparation before they can be used.

If you want to get more familiar with acrylics or oil paints, come try one of our courses! Our amazing teachers will teach you to work with them properly and share some tips and tricks to help you achieve amazing results. We look forward to seeing you!

Top 5 techniques in art

14. February 2022

442d08fcf67829dc95f64f112908c11c

There are plenty of various techniques in art – some are traditional, some are non-traditional, and some could be described as innovative, even. In general, an artistic technique is characterized not just by the materials used, but also by how they are used and applied. Length and direction of strokes, their brightness, the colour mixing method – all these factors are important, and they are also very individual, allowing each artist to create their own style. Still, there are some main techniques defined by the materials used to produce a resulting artwork. The most famous and the most popular techniques include pencil drawing, pastel drawing, watercolour painting, and oil painting. 

Pencil drawing is the simplest of them and it’s where most artists begin. Pencil drawing doesn’t require any special additional skills, and often pencil drawings serve as a preparatory stage for other techniques. However, there are still things to master in pencil drawing, like realism and precision or the secrets of hatching and shading.

Pastels require a rough surface with enough tooth and texture and allow you to both paint and draw with them – that means you can smudge the pastel to create a seamless layer over a larger area (painting) or use it to apply individual strokes (drawing). Pastels tend to look especially nice on dark backgrounds, which is why toned paper is often used for pastel work. 

Watercolour technique is a bit more complicated, and to many people it remains mysterious, perhaps even misunderstood. Its name comes from the Latin word for water – aqua, and the artist’s ability to control water mixed with colour determines how good they will be with watercolours. The paint itself is fluid and transparent, and very receptive to every move of the brush. Despite being sometimes misunderstood, watercolours are very popular with many great artists.

When it comes to oil painting, there are two distinct approaches: with or without underpainting. The first approach requires some rather complicated preparations, although there are no dogmatic rules when it comes to working with oil paint. The best thing you can do is to try them out and decide what works for you, and don’t get discouraged – even a non-professional artist can handle oil paint.

Recently, a new technique appeared and quickly gained popularity – digital drawing, with artists using drawing tablets and special stylus pens. This is great for both beginners and experts, and there are plenty of specialized programs that are designed to help both adults and children master digital art.

Whatever technique you decide to choose to develop and show off your creative abilities, don’t forget that only practice makes perfect. And for those whose heads are spinning with all the options to choose from there is also a solution – come to our drawing and painting course for beginners and let one of our amazing teachers guide you as you try your hand at all the most popular techniques to discover which one suits you best!


Nose drawing explained

14. February 2022

nose-hryashch
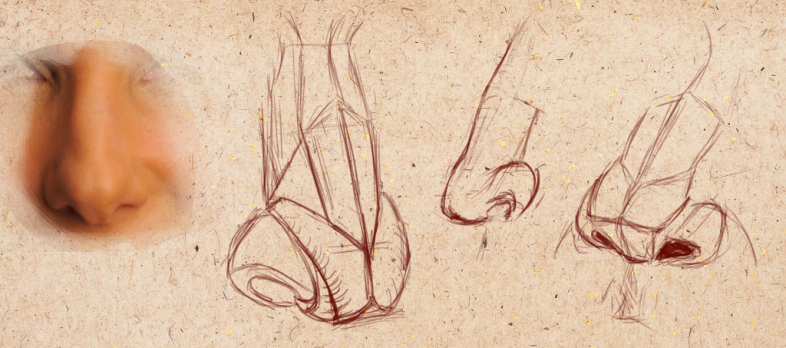
Have you ever tried sketching human faces? Did you find it difficult? Rightly so – when you attempt to sketch a face, you must put all the features together correctly, follow the anatomy, and, most importantly – you have to draw a good nose. But how on earth do you do that? Well, grab your sketchbook and let’s give it a shot together!
The key element of sketching is the speed that you work with, allowing the artist to quickly capture items or ideas on paper. By mastering sketching, you can quickly lay your thoughts, emotions, and memories on paper, saving them for later work.

But let’s get back to sketching faces and noses. We’ve put some tips and tricks together to help beginners get comfortable drawing noses with nothing but a simple pencil. The key is sticking to the proportions and paying attention to detail. Let’s get started!
Step 1: The very basic placement
Draw two perpendicular, intersecting lines to mark the nose placement, keeping in mind that no two people have the exact same nose – there is always some difference.
Step 2: Draw nose contours and nose wings
Nose wings and the nasal bridge are key elements of any nose, so you should start with them. Here’s one thing to keep in mind: the distance between the nose wings is about half the length of the vertical line from step one. Don’t forget about that to make sure your proportions aren’t off.
Step 3: Draw the nose shape
Now it’s time to move to the nose shape. This should be easy if you did the first step correctly. Go ahead and draw the nose’s rounded shapes and the tip.
Step 4: Details
Use an eraser to remove any extra lines to keep the drawing nice and clean and shift your attention to small details. Is the width of the nose a bit off? Fix it to your liking. Continue by adding nostrils and perfecting your picture until you are happy with the shape and what you see, keeping in mind that even the smallest imperfection can ruin the entire picture.
Step 5: Volume
Volume is necessary to make the nose look realistic, so in comes the shading! Use your pencil to add shadows to create a nice, three-dimensional nose drawing like a real pro. Always keep proportions and anatomy in mind and pay attention to every line and every shade, using a soft pencil.
Final tip: Professionals sketchers suggest laying down facial features like eyes, nose, and mouth first when you decide to sketch faces because these are the elements that need the most attention. Everything else can be fixed easily, but if you fail at capturing the nose or the eyes correctly, your entire drawing will look different, with the resulting portrait not really matching your model.
So, how did it go? These steps should help you draw different noses with ease, even if you are a complete beginner. And for those who feel motivated to move forward, polish their skill, and get more experience sketching faces, we invite you to join our figure drawing course – check it out here: and come learn with us!

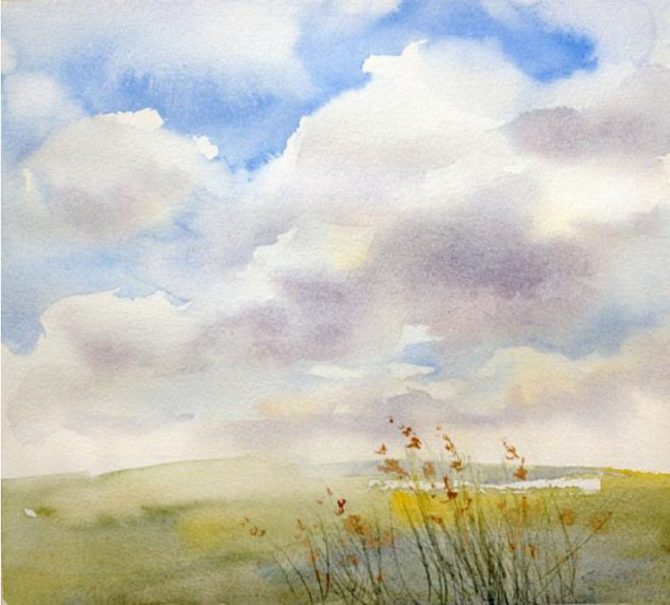
Painting sky with watercolours

13. February 2022

3-7-670×605

Sky is a funny thing – it’s ever changing, taking on countless shapes and colours, and playing different roles in paintings too – it can be your magnificent lead, or a humble extra.

Today we are here to teach you how to paint a beautiful sky and clouds using watercolours with a simple, step by step guide.

But first, we have some useful tips to share:

  1. Use multiple colours in your sky. Don’t limit yourself to blues – use reds and yellows as well to help balance the warm and cool tones.
  2. When using the “wet on wet” technique to paint clouds, keep in mind that the colours will lighten as they dry.
  3. Keep in mind that the closer you go to the horizon, the warmer and lighter the sky appears to be.
  4. Don’t forget about perspective when painting clouds and other three-dimensional objects and add highlights and shadows to match the direction the light is coming from. 
  5. The clouds will look more realistic if you combine sharp and soft contours. 

Now let’s get to work!

Step 1

Wet the paper and wait for it to absorb some of the water. A wet but not glossy surface is ideal.

Now use some yellow (diluted with water) to make a few large brush strokes outlining the position of the clouds. Drawing them with a pencil would have been probably easier, but the empty canvas leaves a lot of space for improvisation. If you do decide to outline them in pencil, try to keep the lines as light as possible.

You can also use watercolour pencils to outline the clouds – this way, any lines you draw will disappear as soon as you cover them with paint.

Step 2

Grab some cobalt blue and start filling in the space above the clouds. Use the flat edge of the brush to keep the strokes light and natural. 

Pay attention to your paper – if it’s too dry, the result will look too hard and sharp. Don’t worry, however – you can always use a wet brush to soften things and blur any sharp transitions.

Step 3

Continue painting the blue sky, moving under the clouds and using more diluted paint to represent the shapes of clouds far away on the horizon.

Step 4.
Now, while the paper is still wet where the clouds are, you can add some shadows with a few light strokes, mixing cobalt blue and cadmium red together to achieve a darker, purplish shade.

Step 5.

Keep adding shadows and softening the outlines using the flat side of the brush. Use swift, broad strokes to cover the remaining sky areas with a mix of cobalt blue and Naples yellow.

Step 6.
Once the sky is finished, add some details to the foreground to make the painting look finished and complete.

That’s it – just look at that pretty landscape painting you just made! If you enjoyed the process and want to learn more about drawing and painting landscapes and nature, we invite you to join our landscape painting course and see what you can do with coloured pencils, pastels, watercolours, and oil paints!

Painting on fabric

13. February 2022

xADK5QC0ZAs

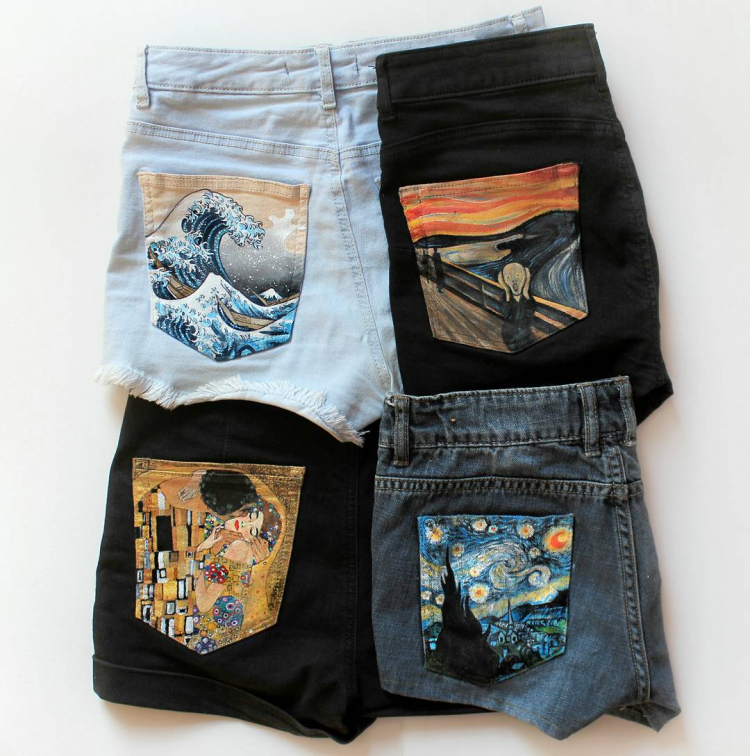
Painting on fabric is a great way to breathe new life to an old, plain t-shirt, boring tank top, or any other piece of clothing! Mastering this technique will allow you to easily transfer your ideas to any fabric and create unique pieces for your wardrobe or your home décor. Follow our tutorial to learn how to create your drawing, transfer it to any fabric, and bring it to life!

Fabric paints

Acrylic, polymer-based paints are the best choice for fabric painting. Their pigments don’t actually go through the fabric – instead, they coat with a “protective layer”, making the fabric structure denser and less elastic. 

Paint will make any fabric vibrant, colourful, and unique. Acrylics have an added bonus here – they are waterproof!


Why choose acrylics

Acrylics really are the best choice for painting on fabric – if you don’t believe us, just look at how popular they are among enthusiasts and professionals alike. So what makes them so great?

– Wide range and availability
– Safety and ease of use
– Option to use water to dilute them
– Water resistance, detergent resistance

Acrylics are also easy to mix, allowing the artist to experiment with new, original shades. Setting a layer of acrylic paint is easy as well – all you need is a warm (not too hot!) iron.

Acrylics can be used on clothes, but also shoes, purses, or other items – for instance, you can decorate your own umbrella!

Paint manufacturers usually indicate what types of fabric are suitable for use with the paint:

If the package says “silk”, the pigment is designed for painting on soft, thin fabrics like silk, batiste or chiffon. 

A label that reads “Textile” means you can paint on denser fabric, leather, velvet, and suede. 

On a dense fabric, an acrylic stencil can look very nice as well, with the fabric’s density allowing for clearly defined edges and vibrant colours.


Preparation
Before you start painting, take time to prepare your fabric properly and carefully by submerging it into cold water for about an hour and then slightly stretching it. Rinse with clean water, then let your fabric dry and finish preparations by ironing it.

If you are using a thin fabric like silk or batiste, stretch it on a wooden frame and let it dry completely. If you want to work on a piece of clothing it is best to separate the layers (like front and back) with a piece of cardboard or thick paper.

Painting techniques
There are certain rules you should keep in mind when applying the paint:

Make sure to put an impermeable foil or wax paper under the fabric you are painting on to protect your desk (or whatever surface you are using to work).
If you are using a stencil or pattern, work the way you would with a colouring picture for children. The only difference is that when applying acrylics in layers, you need to wait for the previous layer to dry completely before adding the next one.
Apply light colours first, then move on to darker shades.
Stick to these simple rules and create your own amazing acrylic-decorated fabric that will last through repeated washing! Find some awesome inspiration and dive right into it. Good luck! 😊

1-2017-Akvarelova-Ilustrace-1-94

Our newsletter!