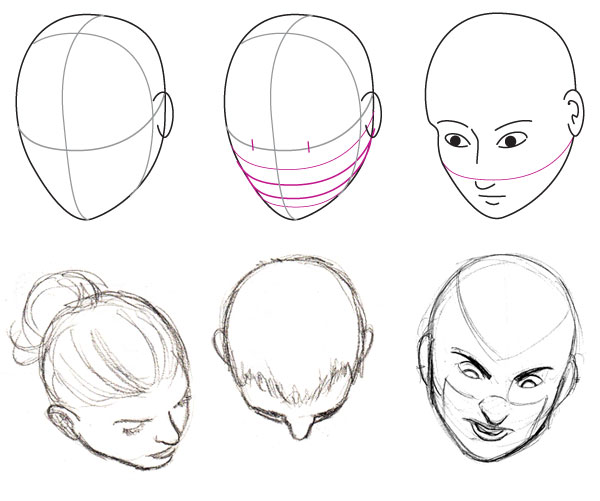
Go to

#portrait

Draw-Planet-Kurz-Foto-Portretu-11

Everyone wants to look great in pictures, but not every photographer knows how to take a good portrait. That’s why we put together a list of 12 tips on various aspects of photography to help you take better portraits, from lighting to lenses. Make your portraits look amazing!

Use natural lighting


If you are working inside, have your model sit close to a big window – diffused light smooths out hard shadows and creates a more attractive image (unless the light is shining directly into the window). Have your model turn their face toward the light – it’s important to make sure that the face isn’t hidden in the shadow. Make sure to turn off all artificial light as well, otherwise there will be a yellow tint to your pictures.

Don’t take pictures in bright, direct sunlight


Working with bright sunlight is extremely difficult – your model will probably tend to squint, and there will be ugly, hard shadows on their face too (see pictures above). It is much easier to take pictures outside when it’s overcast, or when the sun is lower. If you still decide to take pictures on a sunny day, make sure to pick a shaded spot. 

Master hard light

If you are taking your pictures on a bright, sunny day and there is no source of shade anywhere, use diffusers to soften the light. Diffusers are translucent and they come in a variety of shapes and sizes. Foldable oval diffusers are the best option – they are easy to install and transport. In the left picture, the diffuser was placed at an angle above the model’s head. You can also make a diffuser at home using white paper or white cloth. 

Use low aperture

Well-known advice for portraits is using a low aperture to create a blurry background and bring more focus to your subject. Many DSLR and non-DSLR cameras will allow you to manually adjust the aperture (f). The lower the number, the bigger the lens opening, and therefore more light coming through and reaching the sensor. The higher the f number, the smaller amount of light can enter the lens. You can achieve a similar effect using your phone’s camera too – look for portrait mode on an iPhone and for Selective focus options on Samsung phones.

Avoid wide-angle lenses


Taking a portrait with a wide-angle lens can distort your subject, making it look funny. So, if you aren’t looking to add a surreal effect to your photos, make sure to use a lens with a focal length above 50mm, unless you are taking your pictures from several meters away (to minimize the distortion).

Use reflector panels


Using a reflector panel will significantly improve pictures taken in natural light. Just like diffusers, they come in a variety of shapes and sizes. They are also cheap and easy to transport, and you can even use a white surface or aluminium foil as a makeshift reflector panel.
The left picture shows how a well-placed reflector helps soften the shadows on the model’s face (in our case, the reflector was above her head). Also notice the spark in her eye created by the reflected light!

Use a telephoto lens

If you set a low aperture but your background remains sharp and unblurred, the problem is most likely caused by the focal length being too short. Telephoto lenses are actually great for portraits thanks to their ability to compress the space and make the background blur more intense. The higher the focal length, the blurrier the background. 

Use an external flash

Using your camera’s inbuilt flash isn’t the best option for portrait photography since the flash creates a sharp, direct light that makes photos look flat and dull. If you want to use artificial light, get a flash that can be used separately from the camera. The majority of DSLR cameras are compatible with external flashes that can also be connected remotely, with a cable.

You can also keep the flash on the camera but instead of pointing it directly at your model, point it towards the wall or the ceiling – the reflected light will be much softer and better for portraits. 

Don’t forget the surroundings 

Placing your model in a good, interesting spot is a great way to add depth to your photo – both literally and figuratively. Think about what kind of environment would be the best fit for your subject’s personality. Street graffiti will work great for a street artist, while a natural backdrop will be a good fit for fans of the outdoors. Make sure there are no wires, fences, or other unwanted obstacles in the viewfinder before you take a photo.

Help your model feel relaxed

Most people are shy and don’t feel comfortable in front of the camera. As a photographer, you need to be able to help them relax. Tell a joke (be careful not to touch a sensitive subject), put on some music they like or offer them a refreshing drink.

Take pictures outside

The best and the most interesting portraits come to life when your models are in a familiar environment, allowing you to capture them during their daily life. It’s this type of portrait that has made Stephen McCurry, Mary Ellen Mark, and Lauren Greenfield famous. Try to just go with the flow of whatever activity you are doing instead of getting people to pose for every photo; try capturing people’s portraits when they are at home or doing something they love

Choose interesting models

You will probably agree that boring people make for boring models and boring pictures. If you want to expand your portfolio, ask your photogenic friends, relatives or acquaintances to pose for you! And if you are more into documentary photography, pay attention to interesting characters you meet when you travel or on the streets of your hometown.

Want to learn more? Join our new photography course to get professional guidance and many, many more amazing photography tips and tricks! 


Jacksons_Tones_Atmos-1024×683

Every skin tone contains three basic colours – blue, red, and yellow – in different ratios depending on how light or dark the skin is, whether it’s in the shadow or out in the light, and also depending on the body part. For instance, thin skin, like that on your temples, tends to carry cooler shades while the tip of the nose is usually darker. The first thing to keep in mind is that there is no magic recipe to create the perfect, universal skin tone – you will have to learn to mix your own skin tones, and that’s where the colour ratios come into play.

Now that we’ve established how different skin tones are, our next piece of advice is to avoid those paint tubes with “universal skin tone”. You could use them as a base for mixing the shades you really need for your portrait, but since these pre-mixed skin tones are just a basic mix of blue, yellow, and red, there is no reason why you can’t do that yourself.

A simple mixing method

Start by mixing the same amount of each basic colour together – this will result in a brownish colour, a base that you will lighten and darken, make it warmer or cooler.

Note: if you get more of a greenish colour, simply add more red to balance it out since some paints and colours can be more dominant than others.

In portrait painting, just like in landscapes, your best bet is to try to capture the colour you see as closely as possible. Take a good look at the colour on your model picture or your live model’s body and try to create the same shade on your palette, comparing it to your model as you go to fine-tune and perfect it. Think of these questions as you work towards that perfect shade.

  1. Do I need a lighter or a darker shade? If the answer is lighter, add yellow or white. The white will also make the shade cooler and more coating, while the yellow will add warm undertones. Use dark ochres, rusty shades (like burnt umber) or chromatic blacks (like burnt sienna combined with ultramarine blue) to make your mix darker.
  2. Do I need a cooler or a warmer shade? Add blue (or white to simultaneously lighten the mix) to make your shade cooler. Use yellow or warm red to add warmth to your skin tone mix.
  3. Do I need to make my skin tone more or less saturated? Use the opposite colour to balance things out.

You can also use earthy colours like ochre, rust, or black shades, but keep in mind that even these can be created by mixing the three basic colours together. In the end, it’s up to you to decide what mix works best for you.

An example palette

Let’s take  a look at some colours that you can start with and then add, remove, or change colours on your palette to your liking.

  1. Titanium White
  2. Cadmium Red Light
  3. Cadmium Yellow Medium
  4. Ochre
  5. Burnt Sienna
  6. Burnt Umber
  7. Ultramarine Blue

For light skin tones, use a mix of 1, 2, 3, and 5.

For medium tones, use 2, 3, 4, and 5.

For dark skin tones, use 2, 5, 6, and 7.

Create a series of different shades for different colours that you use – for instance, keep adding more and more white to Cadmium Red, creating a variety of shades available to you. Do the same for your skin tone mixes to create a perfect dark-to-light palette to use for adding shadows and highlights to your portrait without having to mix a new shade from scratch every time.

A tip to get you started in skin tone mixology

Start by looking at your own skin and try to mix shades that match your hands. Take note of how different colours and shades look depending on different lighting and light sources. Next, try to mix a shade that matches your face, examining the colours and different shades you see in the mirror. Then, try to mix them from memory. Printing out pictures of people and trying to mix a shade to match their skin is also a great way to practice. Also, did you notice that not once did we use orange or pink  like we used to do as kids? 😊 

Want to learn more and become a real pro? Join us at our portrait drawing and painting course. We look forward to meeting you!

plongee

The face is the first thing we humans notice and pay attention to, and the ability to capture the face, emotions, and facial expressions on paper is definitely an important one. In this article, we will discuss the key aspects of drawing a face – proportions, features, and angles.

Facial proportions

En face (front view)
From this point of view, the skull looks like a circle with the jawline attached to it. Together, they create a shape of an egg with the narrow end pointed down. Two perpendicular lines meet in the centre of the “egg”, dividing it into four parts.

Feature placement:

Find the centre of the left and the right half of the horizontal line. This is where the eyes are.
Divide the bottom part of the vertical line into five equal parts. The nose tip is at the second point from the centre down. The mouth line is the third point, just below the nose tip. 

Divide the upper part of the vertical line into four equal parts. The hairline (unless your character is bald) is between the second and third point moving from the centre. Ears are framed by the upper eyelid and the nose tip (if the person you are drawing is looking straight ahead). If the person looks up or down, the ear position will change.

A good tip to remember: The face is roughly five eyes wide (or a bit less). The space between the eyes is equal to the size of an eye – that’s why you can always tell when someone’s eyes are unusually close or far apart. When the eyes are further apart, it makes the person look childlike and innocent, while eyes that are close together usually make people look suspicious. The distance between the chin and the lower edge of the mouth is equal to the size of an eye as well.

Profile (side view)

From the side, the head shape resembles an egg as well, with the tip pointed downward with a slight slant this time. The central lines now divide the head into the front (facial) and back (skull) part.

Skull:

The ear is right behind the central line. Depending on the size and placement, it is framed by the upper lid and the nose tip as well.

Face:

The facial details are placed just as in the front view.
The nose bridge dip either matches the central line or is slightly above it.
The brow line is the most prominent part (one point upwards from the centre).

Time to practice!

Use the quick sketching method and practice drawing facial expressions of people around you – look at the people on the street or in a café, for instance. Don’t try to capture every detail and don’t be afraid of making mistakes – the key thing is to capture the main characteristics of different expressions from different angles.

If you find it difficult to capture volume, grab a real egg (and make sure it’s cooked, just in case – you don’t want to make a mess) and draw the lines we mentioned above right on the egg. Then examine the egg from different angles and observe how the distance between individual lines changes. You can even draw some basic facial features on the egg, following the guiding lines, and observe them too.

And if you want to really master capturing facial expressions don’t fret, we have a course for that! Join us at Draw Planet and register for our portrait drawing course where you will also try your hand at different media, like pastels or oil paint 😊


IMG_7051

Our newsletter!