How to draw a face – basics and proportions
2. February 2022
Back to blog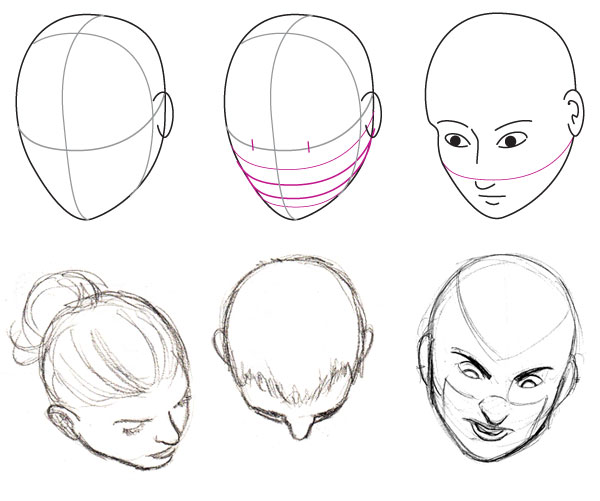
The face is the first thing we humans notice and pay attention to, and the ability to capture the face, emotions, and facial expressions on paper is definitely an important one. In this article, we will discuss the key aspects of drawing a face – proportions, features, and angles.
Facial proportions
En face (front view)
From this point of view, the skull looks like a circle with the jawline attached to it. Together, they create a shape of an egg with the narrow end pointed down. Two perpendicular lines meet in the centre of the “egg”, dividing it into four parts.
Feature placement:
– Find the centre of the left and the right half of the horizontal line. This is where the eyes are.
–Divide the bottom part of the vertical line into five equal parts. The nose tip is at the second point from the centre down. The mouth line is the third point, just below the nose tip.
– Divide the upper part of the vertical line into four equal parts. The hairline (unless your character is bald) is between the second and third point moving from the centre. Ears are framed by the upper eyelid and the nose tip (if the person you are drawing is looking straight ahead). If the person looks up or down, the ear position will change.

A good tip to remember: The face is roughly five eyes wide (or a bit less). The space between the eyes is equal to the size of an eye – that’s why you can always tell when someone’s eyes are unusually close or far apart. When the eyes are further apart, it makes the person look childlike and innocent, while eyes that are close together usually make people look suspicious. The distance between the chin and the lower edge of the mouth is equal to the size of an eye as well.

Profile (side view)
From the side, the head shape resembles an egg as well, with the tip pointed downward with a slight slant this time. The central lines now divide the head into the front (facial) and back (skull) part.
Skull:
The ear is right behind the central line. Depending on the size and placement, it is framed by the upper lid and the nose tip as well.
Face:
– The facial details are placed just as in the front view.
– The nose bridge dip either matches the central line or is slightly above it.
– The brow line is the most prominent part (one point upwards from the centre).

Time to practice!
Use the quick sketching method and practice drawing facial expressions of people around you – look at the people on the street or in a café, for instance. Don’t try to capture every detail and don’t be afraid of making mistakes – the key thing is to capture the main characteristics of different expressions from different angles.
If you find it difficult to capture volume, grab a real egg (and make sure it’s cooked, just in case – you don’t want to make a mess) and draw the lines we mentioned above right on the egg. Then examine the egg from different angles and observe how the distance between individual lines changes. You can even draw some basic facial features on the egg, following the guiding lines, and observe them too.
And if you want to really master capturing facial expressions don’t fret, we have a course for that! Join us at Draw Planet and register for our portrait drawing course where you will also try your hand at different media, like pastels or oil paint 😊