Go to

Draw Place Blog

Nose drawing explained

14. February 2022

nose-hryashch
Have you ever tried sketching human faces? Did you find it difficult? Rightly so – when you attempt to sketch a face, you must put all the features together correctly, follow the anatomy, and, most importantly – you have to draw a good nose. But how on earth do you do that? Well, grab your sketchbook and let’s give it a shot together!
The key element of sketching is the speed that you work with, allowing the artist to quickly capture items or ideas on paper. By mastering sketching, you can quickly lay your thoughts, emotions, and memories on paper, saving them for later work.

But let’s get back to sketching faces and noses. We’ve put some tips and tricks together to help beginners get comfortable drawing noses with nothing but a simple pencil. The key is sticking to the proportions and paying attention to detail. Let’s get started!
Step 1: The very basic placement
Draw two perpendicular, intersecting lines to mark the nose placement, keeping in mind that no two people have the exact same nose – there is always some difference.
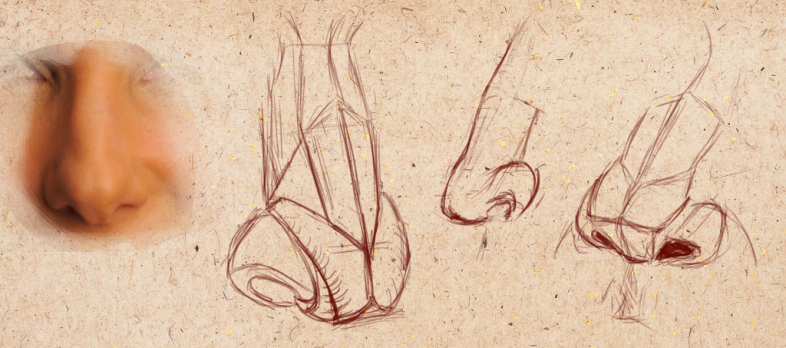
Step 2: Draw nose contours and nose wings
Nose wings and the nasal bridge are key elements of any nose, so you should start with them. Here’s one thing to keep in mind: the distance between the nose wings is about half the length of the vertical line from step one. Don’t forget about that to make sure your proportions aren’t off.
Step 3: Draw the nose shape
Now it’s time to move to the nose shape. This should be easy if you did the first step correctly. Go ahead and draw the nose’s rounded shapes and the tip.
Step 4: Details
Use an eraser to remove any extra lines to keep the drawing nice and clean and shift your attention to small details. Is the width of the nose a bit off? Fix it to your liking. Continue by adding nostrils and perfecting your picture until you are happy with the shape and what you see, keeping in mind that even the smallest imperfection can ruin the entire picture.
Step 5: Volume
Volume is necessary to make the nose look realistic, so in comes the shading! Use your pencil to add shadows to create a nice, three-dimensional nose drawing like a real pro. Always keep proportions and anatomy in mind and pay attention to every line and every shade, using a soft pencil.
Final tip: Professionals sketchers suggest laying down facial features like eyes, nose, and mouth first when you decide to sketch faces because these are the elements that need the most attention. Everything else can be fixed easily, but if you fail at capturing the nose or the eyes correctly, your entire drawing will look different, with the resulting portrait not really matching your model.
So, how did it go? These steps should help you draw different noses with ease, even if you are a complete beginner. And for those who feel motivated to move forward, polish their skill, and get more experience sketching faces, we invite you to join our figure drawing course – check it out here: and come learn with us!

Painting sky with watercolours

13. February 2022

3-7-670×605

Sky is a funny thing – it’s ever changing, taking on countless shapes and colours, and playing different roles in paintings too – it can be your magnificent lead, or a humble extra.

Today we are here to teach you how to paint a beautiful sky and clouds using watercolours with a simple, step by step guide.

But first, we have some useful tips to share:

  1. Use multiple colours in your sky. Don’t limit yourself to blues – use reds and yellows as well to help balance the warm and cool tones.
  2. When using the “wet on wet” technique to paint clouds, keep in mind that the colours will lighten as they dry.
  3. Keep in mind that the closer you go to the horizon, the warmer and lighter the sky appears to be.
  4. Don’t forget about perspective when painting clouds and other three-dimensional objects and add highlights and shadows to match the direction the light is coming from. 
  5. The clouds will look more realistic if you combine sharp and soft contours. 

Now let’s get to work!

Step 1

Wet the paper and wait for it to absorb some of the water. A wet but not glossy surface is ideal.

Now use some yellow (diluted with water) to make a few large brush strokes outlining the position of the clouds. Drawing them with a pencil would have been probably easier, but the empty canvas leaves a lot of space for improvisation. If you do decide to outline them in pencil, try to keep the lines as light as possible.

You can also use watercolour pencils to outline the clouds – this way, any lines you draw will disappear as soon as you cover them with paint.

Step 2

Grab some cobalt blue and start filling in the space above the clouds. Use the flat edge of the brush to keep the strokes light and natural. 

Pay attention to your paper – if it’s too dry, the result will look too hard and sharp. Don’t worry, however – you can always use a wet brush to soften things and blur any sharp transitions.

Step 3

Continue painting the blue sky, moving under the clouds and using more diluted paint to represent the shapes of clouds far away on the horizon.

Step 4.
Now, while the paper is still wet where the clouds are, you can add some shadows with a few light strokes, mixing cobalt blue and cadmium red together to achieve a darker, purplish shade.

Step 5.

Keep adding shadows and softening the outlines using the flat side of the brush. Use swift, broad strokes to cover the remaining sky areas with a mix of cobalt blue and Naples yellow.

Step 6.
Once the sky is finished, add some details to the foreground to make the painting look finished and complete.

That’s it – just look at that pretty landscape painting you just made! If you enjoyed the process and want to learn more about drawing and painting landscapes and nature, we invite you to join our landscape painting course and see what you can do with coloured pencils, pastels, watercolours, and oil paints!

Painting on fabric

13. February 2022

xADK5QC0ZAs

Painting on fabric is a great way to breathe new life to an old, plain t-shirt, boring tank top, or any other piece of clothing! Mastering this technique will allow you to easily transfer your ideas to any fabric and create unique pieces for your wardrobe or your home décor. Follow our tutorial to learn how to create your drawing, transfer it to any fabric, and bring it to life!

Fabric paints

Acrylic, polymer-based paints are the best choice for fabric painting. Their pigments don’t actually go through the fabric – instead, they coat with a “protective layer”, making the fabric structure denser and less elastic. 

Paint will make any fabric vibrant, colourful, and unique. Acrylics have an added bonus here – they are waterproof!


Why choose acrylics

Acrylics really are the best choice for painting on fabric – if you don’t believe us, just look at how popular they are among enthusiasts and professionals alike. So what makes them so great?

– Wide range and availability
– Safety and ease of use
– Option to use water to dilute them
– Water resistance, detergent resistance

Acrylics are also easy to mix, allowing the artist to experiment with new, original shades. Setting a layer of acrylic paint is easy as well – all you need is a warm (not too hot!) iron.

Acrylics can be used on clothes, but also shoes, purses, or other items – for instance, you can decorate your own umbrella!

Paint manufacturers usually indicate what types of fabric are suitable for use with the paint:

If the package says “silk”, the pigment is designed for painting on soft, thin fabrics like silk, batiste or chiffon. 

A label that reads “Textile” means you can paint on denser fabric, leather, velvet, and suede. 

On a dense fabric, an acrylic stencil can look very nice as well, with the fabric’s density allowing for clearly defined edges and vibrant colours.


Preparation
Before you start painting, take time to prepare your fabric properly and carefully by submerging it into cold water for about an hour and then slightly stretching it. Rinse with clean water, then let your fabric dry and finish preparations by ironing it.

If you are using a thin fabric like silk or batiste, stretch it on a wooden frame and let it dry completely. If you want to work on a piece of clothing it is best to separate the layers (like front and back) with a piece of cardboard or thick paper.

Painting techniques
There are certain rules you should keep in mind when applying the paint:

Make sure to put an impermeable foil or wax paper under the fabric you are painting on to protect your desk (or whatever surface you are using to work).
If you are using a stencil or pattern, work the way you would with a colouring picture for children. The only difference is that when applying acrylics in layers, you need to wait for the previous layer to dry completely before adding the next one.
Apply light colours first, then move on to darker shades.
Stick to these simple rules and create your own amazing acrylic-decorated fabric that will last through repeated washing! Find some awesome inspiration and dive right into it. Good luck! 😊

DSC_1419
Pencil and paper are not the only tools of a modern artist – there is now something new, loved by designers, artists, and other creative souls. A tablet!
The iPad does a great job at substituting a computer, allowing users to watch videos, play games, and use graphic editors.
Here’s an overview of graphic editors and drawing software for iPad Pro:

Astropad
This clever program allows you to connect your iPad to the computer and use it just like a Wacom drawing tablet, with everything you do on the tablet showing on the screen.
Adobe Draw (Illustrator)
Adobe Draw is designed for vector work, giving your tablet more powerful options and allowing you to create vector illustrations. Illustrator is especially popular among logo designers, so if you are looking to take your logo game to the next level, this is the software for you. Like with all Adobe programs, you will have to pay to use it.
Let’s also talk quickly about how it works. On the left, you will find a toolbar, while the layers are displayed on the right. If you want to do some vector work, you can also upload a raster image (your own creation or something downloaded from the web) to serve as a template for your vector drawing. However, you can also simply start working on a blank canvas – it’s completely up to you and how confident you are in your skill.

Photoshop Adobe Sketch
This Adobe program is designed for raster work and it has some great watercolour options, allowing you to create transparent layers that blend together like real watercolours. Sketch comes with a great variety of tools, colours, and textures; you can work with pencils, pens, create your own brushes, and explore a plethora of other options. As an added bonus, this program is available free!Procreate
The second most powerful illustration program bested only by Illustrator itself. With a wide variety of tools and an option to adjust the pen sensitivity, it allows you to create perfect, seamless linework, beautiful backgrounds, work with masks or colours, and work on your lettering and calligraphy. The best way to get acquainted with the possibilities of Procreate is through the already mentioned lettering work.

For instance, you can easily create Copperplate calligraphy using Procreate’s drawing tool. You’ll find it very simple to use and very similar to using a real pen – the line thickness reacts to the pressure you apply to the stylus, just like with real ink pen. There is also the Streamline feature that you can turn on and off, depending on whether you want it to smooth out uneven lines. But be careful, this feature will make you feel like the stylus is drawing by itself! There is also a neat feature to help you draw straight lines. Start drawing your line, then hold at the end without lifting the stylus and watch it straighten.

Writing on a tablet might seem more difficult than using the good old pen and paper at first – the tablet’s surface is very slippery and doesn’t have any grip like paper does, which allows for better control. But on the other hand, you have the option to change your creations as much as you like and work on them for as long as you wish.

Obviously, this is a very limited list and there are many more programs you can use with your iPad and take your first steps into the future of creativity, just like thousands of artists all around the world before you!

Come to our calligraphy and illustration course to try doing creative work with an iPad! Sign up and let our amazing teachers help you get familiar with the new, amazing options of digital art.

Digital lettering – a calligraphy course with iPad Procreate:
Sketching and illustration with iPad Procreate:
thought-catalog-505eectW54k-unsplash

Creativity and creative thinking have become quite the buzz words recently. But what do they even mean, and can you train yourself to improve them? Many believe that creativity and things like hard work, self-organization, and order simply can’t coexist. However, they are quite wrong – creative thinkers are experienced, versatile, and skilled people, and to become such a person requires hard work, dedication, and responsibility. Therefore, creativity combines thinking, skills, experience, an open mind, and the ability to learn regardless of age or context. 

Creativity means an open mind and open heart, something everyone can practice and improve with the right exercises and tools, keeping in mind that every exercise should help you get rid of narrow-mindedness and change your normal way of thinking. Here are some of our favourite exercises to develop creativity.

1.Grab an everyday item and try to come up with as many non-standard uses for it as you can. Let’s take a spoon, for instance. It’s a great utensil for sure, but it could also become a lamp, an art piece, or a marker for your vegetable patch.

2. Shake it up from time to time and try doing things differently! For instance, if you are used to having lunch at the same place every day, try a different restaurant for a change.

3. Try a different cuisine, walk home using a different route than you normally would, etc. Our life is full of small habits that trap us in our little boxes, if you think about it, so try opening this box of yours and stepping out and beyond it.

4. If you are facing any kind of a problem, don’t try solving it the usual way. People often tend to have the “if it ain’t broke don’t fix it” mentality, but it was Einstein who said that madness is doing the same thing expecting different results. So next time you have to tackle a problem, don’t start working on a solution until you can come up with at least one alternative approach.

5. Engaging in any sort of creative activity is obviously a wonderful way to develop your creative thinking. It doesn’t matter what you do as long as you enjoy it. You can draw, write poetry, compose song lyrics, or perhaps learn to play an instrument. The important thing is that getting great at whatever you choose is not the point – the point is to experience something new, to gain a new perspective, to help your brain start working differently. Because what is creativity if not a disruption of thinking and customary habits, actions, thoughts, and life flow?

6. Travelling or starting a new sport are also great for creativity. The general rule is that any new place or circumstance will greatly broaden your horizons and enhance your creativity. Just make sure to always travel with an open mind and open heart so you don’t miss anything new and exciting!

7. Work on your associative thinking and teach your brain to make dots between seemingly incoherent concepts to improve your memory and train your brain’s skill to combine different things. Not everyone is capable of making such associations right away, so use these tips and methods to work on your creativity, teach your brain to push boundaries and limits, question things and come up with unique solutions.

By the way, getting into drawing is also an amazing way to amp your creativity 😊 At Draw Planet, we have a wide selection of courses covering anything from classic drawing and painting all the way to computer graphics, so everyone can find something they like. Come join us and grow through your art!


IMG_7051

Our newsletter!