How to draw a tree
3. February 2022
Back to blog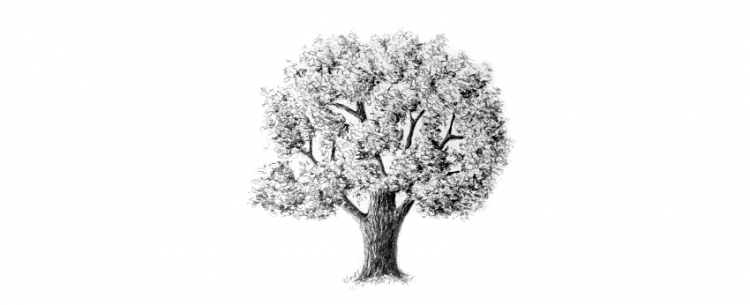
One would think that a tree is one of the simplest things you can draw…but if you have never been too much into drawing, chances are your tree will end up looking too simplistic…

… or too detailed.

Neither of these two pictures resembles a real tree – the first is more like a symbol, while the other is more of a definition of a tree. But as an artist, your main task is to capture what you see, not what you know, and drawing trees is a great way to practice this.
In this blog post, we’ll teach you to draw a very realistic oak tree using a very simple method.
You will need:
– a couple of sheets of paper;
– an HB pencil;
– a medium-soft pencil (2B);
– a soft pencil (5B);
– a pencil sharpener.
You can also make do with a couple of hard HB pencils, but they are not versatile enough to be used in any type of drawing – you need soft pencils to create rich, dark shadows, something you can’t achieve with hard pencils, no matter how hard you push.
Make sure to have a pencil sharpener handy as well – a blunt tip creates lighter and blurrier strokes that don’t match the expected result. Keep your pencils sharp and keep in mind that soft pencils blunt faster than hard pencils!
As for the paper, you don’t need anything too fancy – simple printer paper will do. Don’t make your drawing too big either – the smaller the picture, the less detail you need to add. For reference, the drawings you see in this article are only 9 cm tall.

Our brain works in a curious manner – it notices an entire object first and starts paying attention to details next. And that is why you don’t need to start creating your drawing from the details – you need a base first.
Step 1
Use a couple of very light strokes and dots to outline a simple tree shape. Use a harder pencil (HB) and don’t apply too much pressure – these strokes will not be a part of your finished drawing.

Step 2
Draw a trunk, making it wider at the bottom and narrower at the top. The bigger the tree, the shorter and wider the trunk.

Step 3
Add branches to the upper part of the tree. Keep in mind that tree branches gradually lower down as they grow and make sure to capture that as well.

Step 4
Draw smaller branches growing out of the large branches. The longer the branch, the lower the splitting begins. Keep your strokes light.

Step 5
Use short, quick strokes to outline the treetop and don’t make it too even.

Step 6
Draw the little leaf “clouds” in the treetop with the same short, quick strokes. Leave some areas empty to make some branches visible and make your drawing more lifelike.

Step 7
Make the branches thicker where there are no leaves covering them.

Step 8
Before you start shading, decide which part of the tree will be turned towards the light and where the shadows will be. You can outline them with simple hatching.

Step 9
Use a soft, sharp pencil (2B) to add texture to the trunk, leaving some white parts to capture the bark texture properly.

Step 10
Use soft pencils (2B, 5B) to darken the trunk, keeping in mind where you decided to put your light source and the corresponding light/shadow distribution. Don’t be afraid to apply more pressure to a soft pencil to get a deeper shadow but be careful to not overdo it. The fewer black areas you’ll have in the picture, the more realistic and impressive it’ll look.

Step 11
Grab a hard pencil and add leaf shapes by drawing relaxed, loose circles with quick, sharp movements.

Step 12
Every branch has its own little “treetop” (remember those “clouds” you drew?). Draw them as if they all were small separate trees.
First grab a soft pencil (2B) and use it to make darker circles on the darker side of the tree. Don’t apply too much pressure at first to make it easier to correct potential mistakes.
When you are sure that you have determined where your shadows will be correctly, add the shadows and depth, creating a transition between the dark and light parts.

Step 13
Use a soft pencil (2B) to add a couple of more pronounced leaves to the entire treetop and each individual “mini treetop” to create an illusion of more barely visible small branches.

Step 14
Now use the softest pencil you have to add a few dark accents to the darkest areas of the tree as well, creating more contrast in the treetop. Make sure that all leaves are darker than the “sky” (your background) – no leaves should appear transparent! Go over the light areas with a hard pencil one more time if necessary.

So, drawing a tree wasn’t that hard, was it? All you need to do is capture their real appearance, not a definition of a tree from a dictionary. But this is just the start of your practice – if you want to become really good at drawing trees, make it a habit to carry a sketchbook with you when you go for a walk, look at the trees around you and try to capture them with quick sketches.
Do you love nature? We do for sure, which is why we have an entire course on painting and drawing landscapes at Draw Planet! Learn to work with pastels, coloured pencils, watercolours and oil paints, all the while creating amazing pictures of beautiful flora 😊